
Restoring a Piece of Detroit History: Redesigning the Floor Plan and Building a First-Floor Addition, Part 3
Thoughts of Joe Guadagnino
When we bought our 1906 Detroit Tudor in Indian Village, the bones were extraordinary. The proportions were right. The masonry was right. The craftsmanship was the kind you simply cannot buy today.
The floor plan was not.
In Part 1 we shared why we took on this project and what we found when we opened the house up. In Part 2 we walked through rebuilding every system inside it — electrical, plumbing, heating, insulation. All of that work matters. None of it changes how a home actually feels to live in.
This part does.
Part 3 is the biggest transformation of the entire project: redesigning the first-floor plan of a 120-year-old home and building a rear addition that, now that it’s finished, nobody can pick out as an addition at all.
Why a 1906 Floor Plan Doesn’t Fit a 2026 Family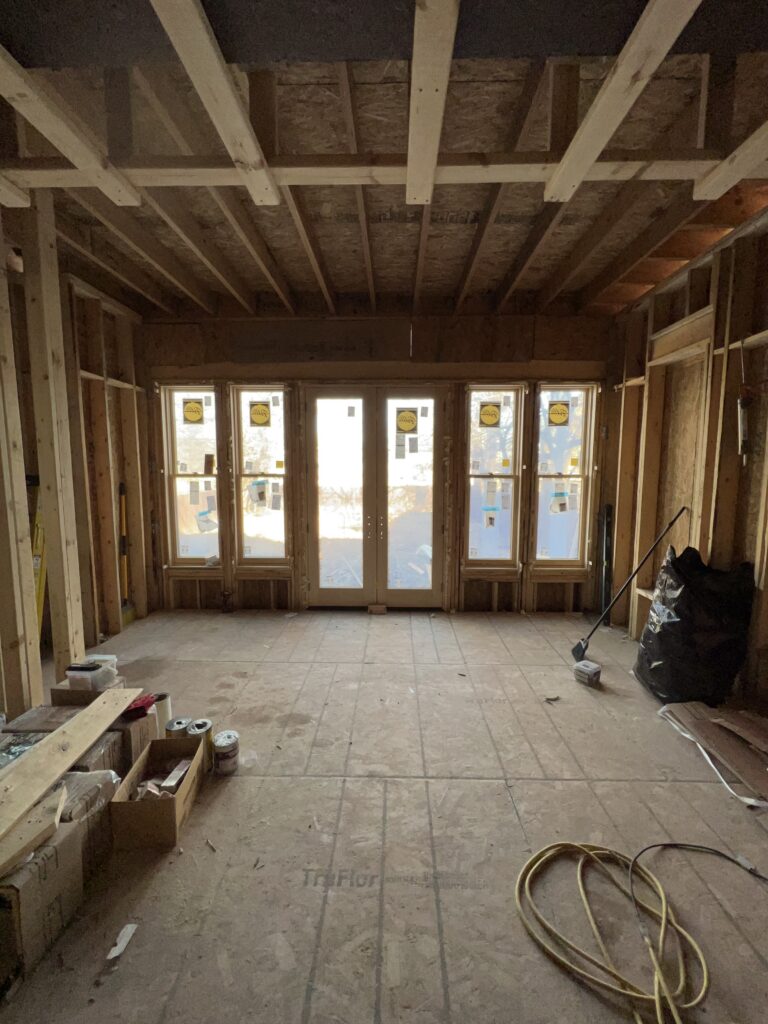
Homes built in 1906 were designed for a completely different way of living.
Rooms were small and separated on purpose. The kitchen was a work space, not a gathering space, and it was pushed to the back of the house where the family rarely spent time. There was a formal dining room, a formal living room, a butler’s pantry, a back stair, and a series of doorways that kept every function of the house in its own box.
That layout made sense when the home was built. It made almost no sense for how our family lives now.
The original first floor was roughly 1,600 square feet divided into seven or eight separate rooms. You could stand in the kitchen and be completely cut off from every other person in the house.
Alyce and I have two daughters. We cook constantly. We host constantly. The way our family actually uses a home is the exact opposite of the way this one was organized — everyone ends up in the same room, and in this house, that room was one of the smallest on the floor.
We didn’t want to erase that history. We wanted to edit it.
Reading the House Before We Redrew It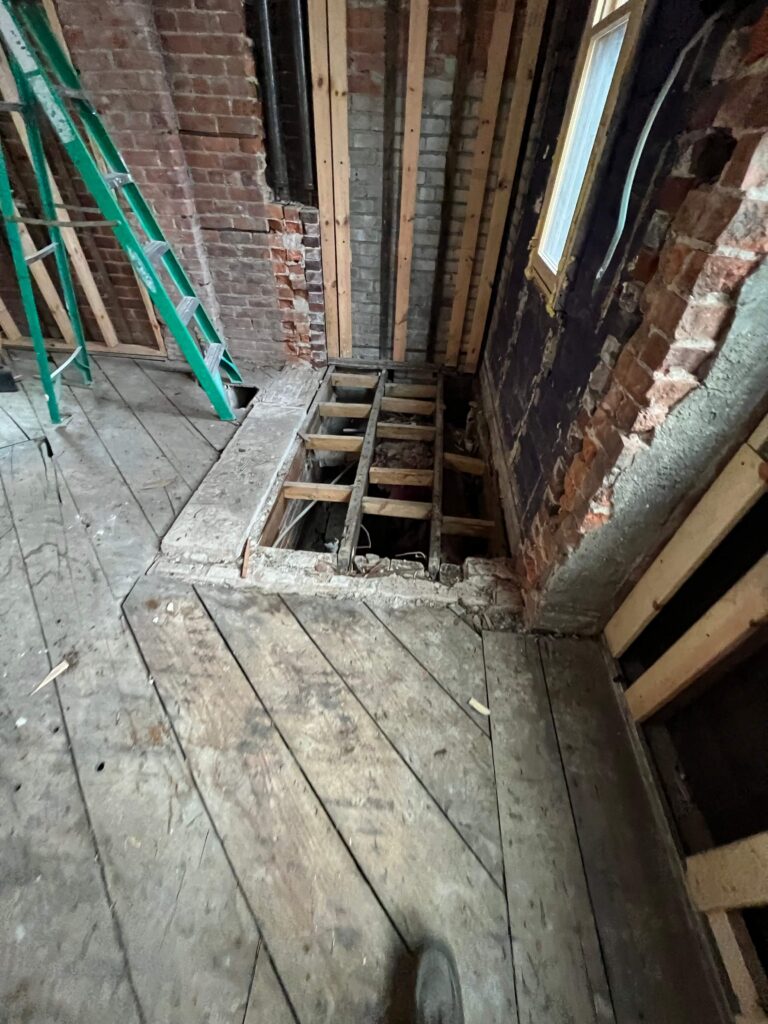
The mistake people make with historic homes is starting with what they want and working backward.
We started with what the house was telling us.
Before we drew a single line, we spent real time studying how the original architect organized the home. Where the sight lines ran. Where the light landed at different times of day. Which walls carried load and which ones didn’t. Where the trim profiles changed, which almost always tells you where original construction ended and someone’s later modification began.
Old houses keep records. You just have to know how to read them.
One of the best discoveries was in the kitchen. Tucked into the corner was a cold room — a small insulated space where the family in 1906 stored cold food and received deliveries, back when a truck came to the house and the iceman was a regular part of the week. It’s a beautiful piece of history and a perfect snapshot of how differently a house had to work before refrigeration.
It’s also 40 square feet of prime real estate in the room where we now spend most of our lives.
We also found something we didn’t expect on the other side of that wall: two openings running as a pass-through from the dining room, into the butler’s pantry, and on into the kitchen. That was the original circulation of the service side of the house — food moving from the kitchen to the pantry to the table without the family ever seeing it happen.
That pass-through ended up shaping the entire redesign. The house had already told us it wanted to flow. We just needed to let it flow in a way that made sense for a family instead of a staff.
The Idea That Changed Everything: Completing the Circle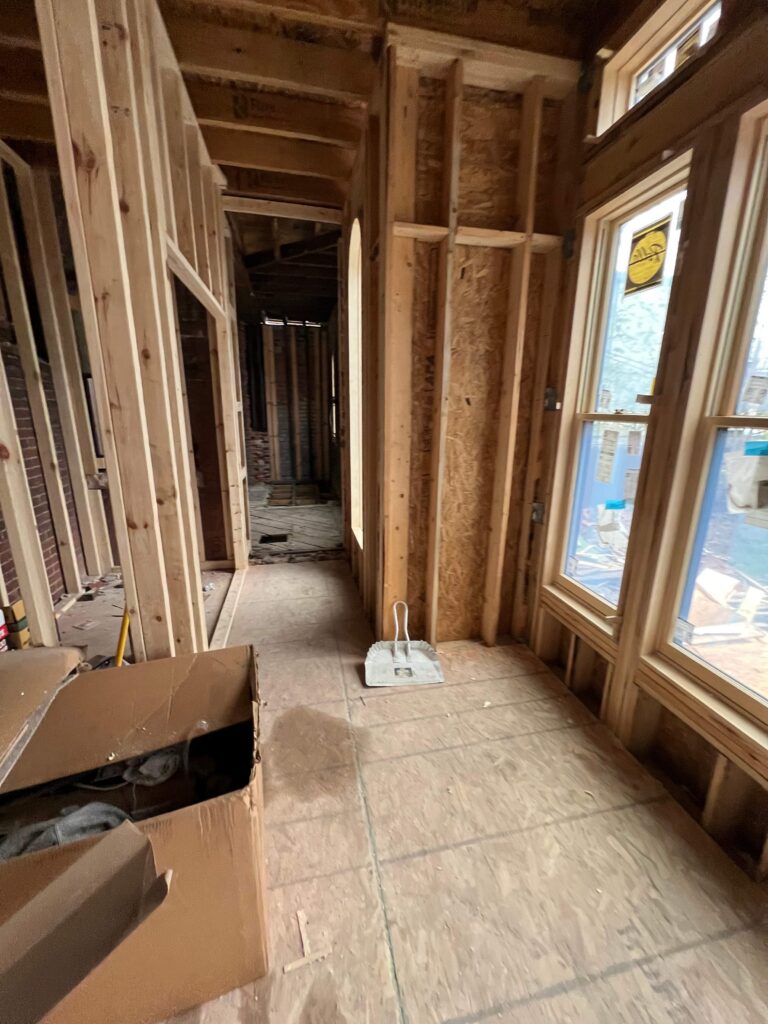
The single best decision in this whole project wasn’t a room. It was a loop.
In the original plan, the first floor was a series of dead ends. You went into the kitchen and you came back out of the kitchen the same way. The back of the house terminated.
In the new plan, the first floor is a complete circle.
You can walk from the living room into the addition, through the new hallway, into the kitchen, through the pantry, into the dining room, and back into the living room without ever retracing a step. The addition created a third opening into the kitchen, and that third opening is what closed the loop.
It’s hard to overstate what circular circulation does to a house this age. Rooms stop being destinations and start being part of a path. When you’re hosting, people move instead of bottlenecking. When the girls are running around, they’re running a lap instead of hitting a wall. The house feels dramatically bigger than the square footage we added, because movement is what makes a home feel large — not floor area.
That’s the whole design in one sentence: we didn’t add a room to a house, we added a connection to a floor plan.
Opening a Solid Masonry Wall
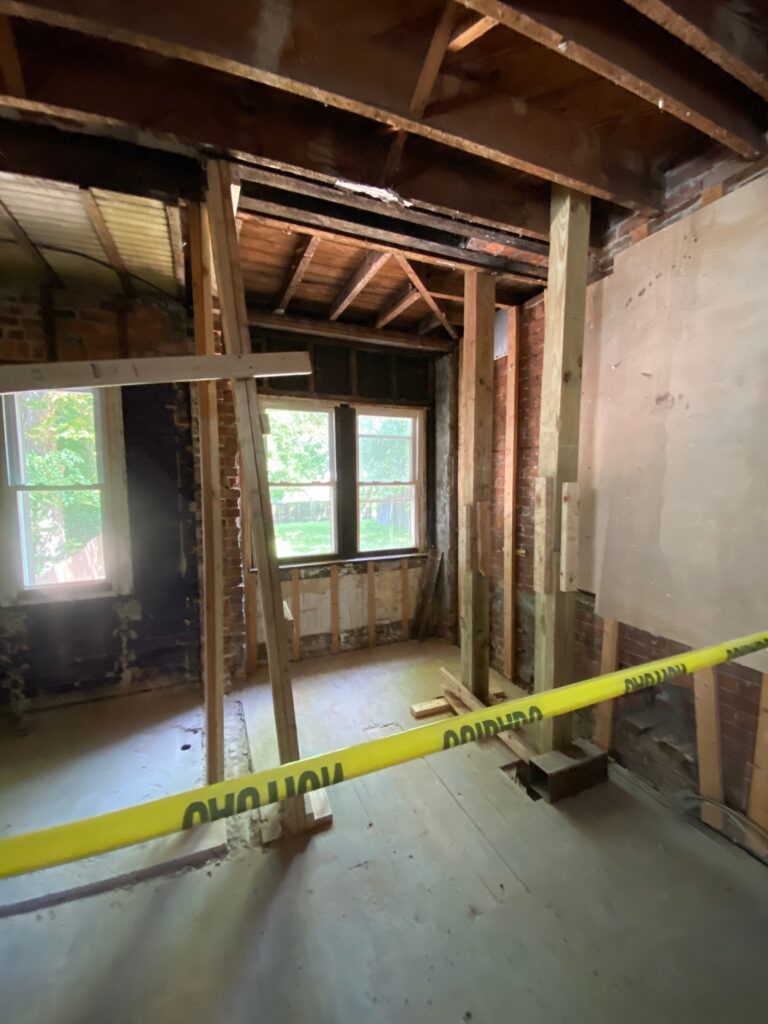
As we covered in Part 1, the exterior of this home is three wythes of solid brick masonry. That’s not a veneer over framing. That’s structural brick doing real work, and it has been doing it since 1906.
To connect the living room to the new addition, we had to take out a section of that wall — a 16-foot opening in a load-bearing masonry exterior.
That load had to go somewhere.
We carried it on a steel beam. Before touching anything, we built temporary shoring on both sides, transferred the load off the wall, cut the opening, set the steel, and then transferred the load back onto it. That process takes days and is completely invisible the moment the drywall goes up.
Steel doesn’t just stop at the floor, either. The point loads at each end of that beam are significant, and they have to travel all the way to bearing. In the basement below, we poured new footings and set steel columns to carry that load down properly.
This is the part of a renovation nobody photographs. It’s also the difference between a floor plan that opens up beautifully and a house that starts complaining about it — in cracked plaster and sticking doors — five years later.
Expanding and Reorienting the Kitchen
We didn’t move the kitchen. We freed it.
The kitchen stayed in its original corner of the house, but almost nothing about it works the way it used to. Taking out the cold room alone made the room dramatically larger. Opening it to the pantry pass-through and adding the third opening from the addition’s hallway turned a sealed-off service room into a space connected to everything around it.
Because we had already rebuilt every system in the house during the phase we covered in Part 2, we could route gas, water, waste, venting, and electrical exactly where the new layout wanted them instead of designing around whatever happened to already be in the walls. That’s a luxury you only get by doing the infrastructure first and doing it right.
The finished kitchen is anchored by a large island, custom inset cabinetry built specifically for this house, and a walk-in pantry that finally gives the room the storage a 1906 kitchen never had to provide.
The cabinetry and millwork deserve their own post, and they’ll get one later in this series. What matters here is what the change did to the rest of the floor. Everything downstream of it improved. The dining room became usable again. The back of the house stopped being a dead end. The room where our family actually spends its time is no longer the room we designed around last.
Designing an Addition That Doesn’t Look Like One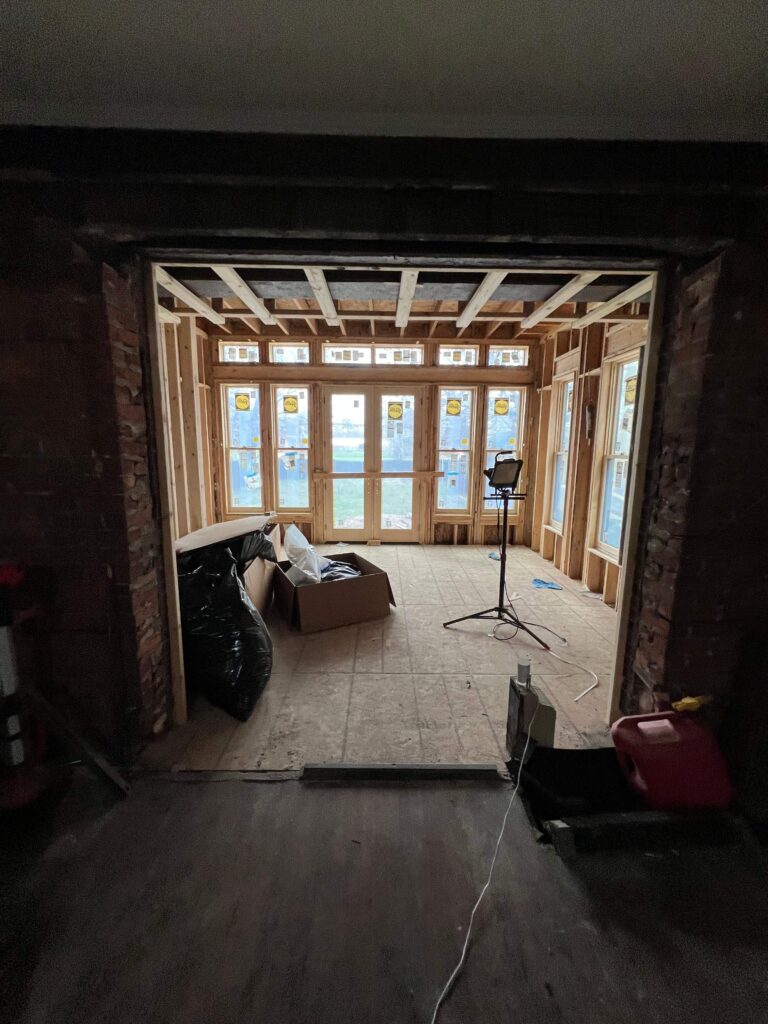
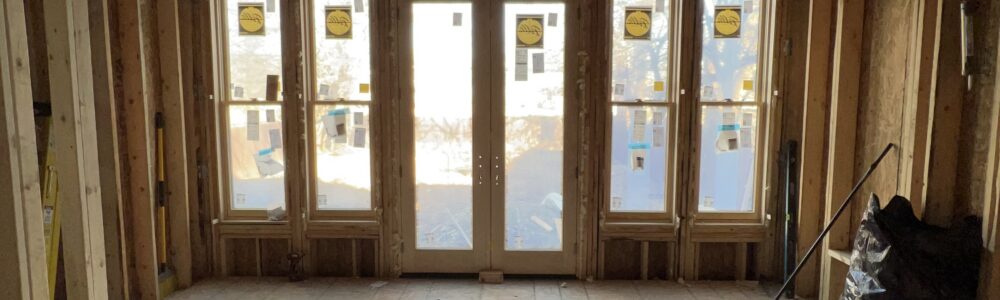
The addition sits at the rear of the house, off the living room. It’s roughly 350 square feet and it holds the new hallway, a powder room, and the connection that completes the first-floor circle. Floor-to-ceiling windows run along two sides.
Here’s the standard we set for it: if somebody walks through this house in twenty years and can point to the seam, we failed.
That’s a higher bar than it sounds like, and most additions on historic homes miss it. You’ve seen the ones that miss it. The roof line is slightly off. The window proportions are a little too wide. The brick is close but not right. The trim got simplified because the original profile was expensive to reproduce. Individually, none of those things are dramatic. Together, they announce themselves from the sidewalk.
Getting it right came down to a few decisions.
The brick. Brick from 1906 is not brick from 2026 — size, color range, and texture are all different. We had brick custom-matched to the original, and we paid just as much attention to the mortar. On historic masonry that matters more than people realize: modern high-portland mortar is harder than century-old brick, and over time the brick will spall and fail before the joint does. Soft old brick needs a softer mix and the right joint profile, or you spend a hundred years damaging the thing you were trying to preserve.
The windows. Window proportion is where additions give themselves away fastest. We used Pella’s historic-series windows, running floor to ceiling on two sides, with head heights and sight lines drawn from the original house. Modern glass performance, period proportions.
The trim. Sills, water table, fascia, soffit returns — we had the profiles custom milled to match what was already on the house. When the details line up, your eye reads one building instead of two.
Restoring a historic home isn’t about turning back the clock. It’s about making sure everything new earns its place next to what was already there.
The Terrace: Turning a Roof Into 400 Square Feet of Living Space
Here’s the part of the addition I’d point to first.
We didn’t put a pitched roof on it. We made the roof a walk-out terrace — roughly 400 square feet of outdoor living space running the full length of the rear of the house, with access from multiple second-floor rooms.
A 1906 Tudor was never going to give us a deck off the back of the second floor. Now it has one, and it doesn’t read as bolted on, because it isn’t. It’s the roof of the addition, doing two jobs at once.
Building a terrace over heated living space is a detail you have to get exactly right the first time. There is no fixing it later without taking the whole thing apart. The assembly is a fully waterproofed membrane roof with a wood deck surface framed above it, so the deck you walk on never traps water against the membrane and the membrane never sees sun or foot traffic.
Nobody standing on that terrace will ever think about what’s under their feet. That’s the goal.
Where 1906 Meets New Construction
The hardest part of any addition isn’t the addition. It’s the connection.
The transition between a 1906 masonry structure and new construction has to work three different ways at once, and each one is its own problem.
Structurally, the addition sits on a crawl space on new footings carried to frost depth. A 120-year-old foundation has long since found its equilibrium; brand-new construction has not. Detailing that junction so the two can behave independently is what keeps a crack from showing up at the seam three winters from now.
Thermally, we now have a modern air-sealed envelope meeting a solid masonry wall that breathes. Get that wrong and you build a condensation problem into the exact spot you can’t inspect. Continuity of the air barrier at that junction was one of the most carefully detailed things in the entire project — and one of the least visible.
Visually, everything had to run straight through. The original first floor has ceilings just under ten feet, and the addition matches them exactly, so there’s no step in the ceiling plane as you pass under the beam. The floors are new white oak, milled to match the original in width and direction, and we sanded and finished the entire first floor as one job — same stain, same sheen, no seam in color where old meets new.
When it’s right, you walk from 1906 into new construction and never register that you crossed anything.
Working Within the Indian Village Historic District
This home sits in Indian Village, which means the addition wasn’t only an engineering and design problem. It was an approval process.
We submitted our drawings to the Detroit Historic District Commission and were approved on the first submission. Between design, drawings, review, and permits, the process ran about two to three months before we could start building.
A lot of homeowners hear “historic district” and assume it means they can’t do anything. That hasn’t been our experience at all. What it actually means is that you need to do the work properly, document your intent clearly, and design something that respects the neighborhood instead of fighting it. Showing up with complete drawings that demonstrate you understand the architecture changes the entire conversation.
The rules aren’t the obstacle. Rushing past them is.
If you’re planning an addition on a historic home in Detroit or anywhere in Metro Detroit, build the review process into your schedule from day one. It is far cheaper to design within the guidelines than to redesign after a denial.
Historic Floor Plan Redesign Throughout Metro Detroit
We’ve done this kind of work on historic homes throughout Detroit, Birmingham, Bloomfield Hills, Grosse Pointe, Plymouth, Franklin, Beverly Hills, Royal Oak, and Huntington Woods.
The specifics change from house to house. A 1920s colonial in Birmingham is framed differently than a 1906 Tudor in Indian Village, and a Grosse Pointe home from the same era may have entirely different masonry underneath it. But the approach doesn’t change: understand the original design intent, separate what’s original from what somebody added later, solve the structure properly, and make everything new look like it always belonged.
Every historic home in this region is worth that level of care. There aren’t any more being built.
Frequently Asked Questions About Historic Home Additions
Can you remove walls in a home built in the early 1900s?
Often, yes — but it takes structural engineering, not guesswork. Homes from this era have bearing walls and floor systems that need properly sized beams and posts, with the load carried all the way down to new or reinforced footings. In our case a 16-foot opening in a solid masonry wall required a steel beam plus new footings and steel columns in the basement. The work is very doable. It just has to be done correctly.
Will an addition hurt the value of a historic home?
A poorly designed one can. A well-designed one typically increases value significantly, because it gives a buyer the layout they want without giving up architecture they can’t get in new construction. The difference is entirely in the execution.
How long does a historic renovation with an addition take?
Longer than people expect. Our own project took four years from start to finish, including design, historic district review, permitting, and construction. Scope drives everything, but plan on a longer timeline than a comparable project on a newer home.
Can new brick be matched to 1906 brick?
It can be matched very closely with custom-matched product or reclaimed brick. Mortar matters just as much — using a modern hard mortar on soft historic brick will damage the original masonry over time.
Do I need an architect for a historic home addition?
For anything involving structural changes or an addition, yes — you want proper drawings and structural engineering, both for the approval process and for the result. In a historic district, complete drawings are also the single biggest factor in getting approved without a fight.
Can you open up a floor plan without losing the home’s character?
Yes, and it’s the central challenge of this kind of work. The key is being honest about what’s original, being selective about what you remove, and detailing every new opening with trim and proportions that match the home’s original language.
A House That Finally Works
Standing in that framed opening between the 1906 structure and the new addition was one of the moments of this project I’ll remember.
On one side, brick laid by hand in 1906. On the other, framing we set ourselves. And in between, a first floor that finally moves the way a family actually moves.
We finished the renovation before we ever moved in, which meant we spent years working on a house we didn’t yet live in — imagining the loop instead of walking it. The first night we were finally in it, the girls ran the circle from the living room through the addition into the kitchen and back around through the dining room. Over and over. That was the whole design, being tested by the only people whose opinion really mattered.
Frankie and Rose won’t remember the shoring walls, or the steel beam, or the months of drawings. They’ll remember that you could run all the way around.
Our 1906 Detroit Tudor was built to last. Now it’s built to be lived in.
Follow Along With Our Detroit Historic Home Renovation Series
- Part 1: The Story Behind Our 1906 Tudor Renovation
- Part 2: Bringing Our 1906 Detroit Tudor Into the 21st Century
- Part 3: Redesigning the Floor Plan and Building a First-Floor Addition (you are here)
Coming Next: Part 4 — Preserving the Character of a Historic Detroit Tudor
In Part 4, we’ll get into the details that make this home feel authentic rather than remodeled: the original millwork, doors, and plaster we saved, what we restored versus what we replaced, and how we made brand-new custom work look like it has been here since 1906.
Be sure to check back soon for Part 4 of our Detroit Historic Home Renovation Series.
Thinking about a historic home renovation, addition, or floor plan redesign in Detroit or anywhere in Metro Detroit? We’d be glad to talk it through with you.
Call Now at 248-809-0177